


I need to begin this post by saying that I would NEVER in a million years have figured out how to make a shape inside a cake without a tutorial from Amanda at I am Baker. She has made all kinds of crazy creative cakes and to see some of the wonder click here.
In fact, I had never decorated cookies or tried any icing techniques until one day last January when I stumbled upon that blog. When I saw her ornament cake I nearly fell off me chair. I was smitten, and have been trying like crazy to learn the art of confection decorating ever since. I was so inspired, that I immediately attempted to make a cake inside a cake - and made a real hot mess out of it. It was so humiliating and depressing that I didn't even THINK about making another one until I made the brownie truffles a few weeks ago. As I was molding the brownies, I started to realize that the brownie would make an excellent witch hat material. So I put on a brave face, and tried again.
And it WORKED!

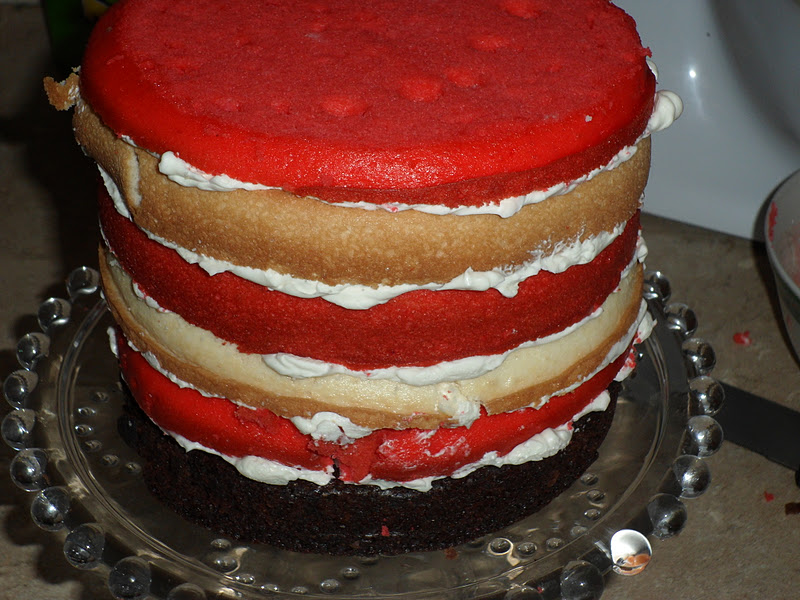
Now comes the tricky part. You carve a cone shape out of the red and white layers, going all the way through to have the point at the bottom.

Go slowly, take your time, start in the middle, don't make yourself sick eating cake scraps. Now take the pan of undercooked brownies and crumble it up in a bowl. It is now time to pack the brownie scraps into the cone. Pack it down well.

Hang on because you are almost there. Take the 6 inch brownie layer and place it on the very top.

Flip the entire sha-boom upside down on your cake plate.
Chill the cake to firm it up again. Sit down and have a
I felt like I hadn't made any major errors, but I was still a nervous wreck cutting into it. I made real certain that I started in the center of the cake and wiped the knife after each cut. Then, TA DA!

You certainly don't have to use brownie, you could use cake crumbles mixed with icing like you would for making a cake ball (another major disaster of mine...I fear the cake ball). So that's how it is done and I was over the moon that it worked. Let me know if you give it a try or if you have any questions. I'd love to cheer you on!
HOLY WITCH HAT BATMAN!!! When you put this up the first time I was like "how the heck did she..." but then again you are fabulous and fantastic so I was not at all surprised at your ability to make a witchy hat cake!!!!!! Now, I doubt I will ever have tea (nor other drink) stiff enough (ha ha) to muster the courage to do this but I so appreciate the fun time I had reading the tutorial!!!!!! Maybe...just maybe I could do it on a smaller scale...say cupcake style? HA!
ReplyDeleteAmazing! You sure must have a lot of patience for something like that! It looks great!
ReplyDeleteYour work looks like you have been decorating for years!! You are a natural. xo
ReplyDeleteThat is amazing. I thought it was magic, I could not figure out how that was done. I will have to try it.
ReplyDeleteThanks
Sue
The cake really turned out cute, great tutorial! "Fear the cake ball" cracks me up, I understand:@)
ReplyDeleteMmmmmmm!! That looks delicious!! Thank for sharing!!
ReplyDeleteVery cool- Thanks for sharing your how-to.
ReplyDeleteAbsolutely stunning! I love this. Thanks for the tutorial. :)
ReplyDeleteAmazing this cake !! I love your layers, thanks for the tutorial :)
ReplyDeleteHappy Halloween
Joyce
Too cute! I love the element of surprise! Shared on my Facebook!
ReplyDeletehttp://www.facebook.com/pages/Le-Chateau-des-Fleurs/113300158681218
Great blog! Do you have any suggestions for aspiring writers?
ReplyDeleteI'm planning to start my own site soon but I'm a little lost on everything.
Would you suggest starting with a free platform like Wordpress
or go for a paid option? There are so many choices out there that I'm completely overwhelmed .. Any ideas? Thank you!
Also visit my webpage :: erinmore mixture
Hi there i am kavin, its my first time to commenting anywhere,
ReplyDeletewhen i read this article i thought i could also make comment
due to this good post.
Feel free to surf my website drum tobacco prices
I just couldn't leave your web site before suggesting that I really enjoyed the usual info an individual provide in your guests? Is gonna be again continuously to check up on new posts
ReplyDeleteFeel free to surf my homepage ... mac baren tobacco
Pretty section of content. I just stumbled upon your weblog and in accession capital
ReplyDeleteto assert that I acquire in fact enjoyed account your blog posts.
Anyway I will be subscribing to your feeds and even
I achievement you access consistently rapidly.
Also visit my page : samson tobacco
It's really a great and helpful piece of information. I'm glad
ReplyDeletethat you just shared this useful information with us.
Please stay us up to date like this. Thank you for sharing.
Look into my homepage : amphora pipe tobacco
Thank you for any other informative site. Where else may just I get
ReplyDeletethat type of information written in such a perfect approach?
I've a project that I'm just now operating on, and I have been on the glance out for such info.
Here is my website :: captain black
Hello there, I do believe your blog could be having internet browser
ReplyDeletecompatibility problems. Whenever I take a look at your site in
Safari, it looks fine however, when opening in IE, it has some overlapping
issues. I merely wanted to provide you with a quick heads up!
Apart from that, wonderful website!
Feel free to surf my page whitening skin
I'm not positive where you're getting your information, however good topic.
ReplyDeleteI must spend some time finding out much more or working
out more. Thanks for magnificent information I used
to be on the lookout for this info for my mission.
Feel free to visit my blog ; how to lose man boobs
Howdy! This is kind of off topic but I need
ReplyDeletesome guidance from an established blog. Is it very hard to set up your
own blog? I'm not very techincal but I can figure things out pretty fast. I'm thinking
about setting up my own but I'm not sure where to begin. Do you have any tips or suggestions? With thanks
My web blog :: clinical professor
Heya i'm for the primary time here. I found this board and I to find It really useful & it helped me out much. I am hoping to give something again and help others such as you helped me.
ReplyDeleteAlso visit my blog : shullo.com