


It has been not quite a year since I began my cookie decorating, and I have learned (mostly the hard way...) quite a few little tips that make life much easier and more successful in the realm of cookies. Because we are on the verge of holiday baking season, I wanted to share what I have found to be helpful.
This is a fairly long post, so pour yourself a cup of something warm and we will have a little chat about making sugar cookies.

BAKING
* There are plenty of good sugar cookie recipes out there and all I will say is to use a good deal of flavoring in your dough - one teaspoon is never enough. Real vanilla extract and some almond or lemon extract makes a cookie go from hockey puck to tasty.
* Don't try to roll out cookie dough until it has been well chilled. I chill mine for a MINIMUM of 4 hours before rolling it out. Not only is chilled dough easier to work with, it helps the cookie maintain it's shape.
* I like to roll out my dough on a large wooden cutting board with an old wooden rolling pin. Nothing beats it. To keep the dough from sticking, use as much flour as you need. If you want, you can use powdered sugar instead of flour. It is an excellent way to keep the dough from sticking and adds to the sweetness.
* NEVER use an insulated baking sheet with sugar cookies because they won't firm up well. Regular old baking sheets work great.
* I try to bake roughly the same size and shape cookie on each baking sheet. If you put a large round cookie on the same sheet as, for instance a small cookie or one that has very narrow shape like a broom, they will bake at different speeds - you will end up with the smaller ones being over baked or the larger ones being under baked. Not a good situation at all. Bake for the minimum time and check them. Don't let the cookies bake long enough to brown - you want a nice even light tan color.
* After the cookies are out of the oven, I always let them sit on the baking sheet for approximately three minutes so they have a chance to firm up before being moved to a cooling rack.

* While they are still on the baking sheet fresh from the oven, you have a small window of opportunity to gently reshape the cookies if they haven't gotten a little out of shape (which happens if the dough is too warm before it goes into the oven). Use a spatula or knife to do the reshaping.
* Speaking of spatulas, razor thin is the only way to fly. If you use a thick one, the warm cookie will loose some of it's shape while being lifted off the sheet. You want the spatula to be so thin, you could cut your finger on it - not that I recommend you doing that of course :)

* Don't even think of decorating them until they have had a chance to thoroughly cool.
DECORATING

* This important folks, so listen up: no matter how beautiful a cookie is, it is a no go if it doesn't taste great. I don't like the taste of traditional royal icing so I use one made of powdered sugar, corn syrup, milk, a tiny bit of meringue powder, and some flavoring like almond or vanilla. I would give you a recipe, but the truth is that I don't measure. I find that that weather tremendously effects the icing so I adjust for humidity and what purpose I have for the icing. Example: lots of humidity in the air, more powdered sugar. Using a very tiny tip, more milk so it will easily flow out of the tiny opening. Writing or fine detailing, more meringue powder and less corn syrup. Basically, I use the LEAST amount of meringue powder I can get away with because it tastes NASTY. Play with your icing and don't be afraid to adjust a recipe to suit your needs.
* My favorite tools for decorating are disposable Wilton bags, PME tips, cling wrap, toothpicks, and safety pins. I use the toothpicks to help push the flood icing into the corners and pop air bubbles. The safety pins come in very handy for clearing the small tips that get pesky clogs in them. And what do I do with the cling wrap? It is the best tip of all!!!
* Wrapping the icing in cling wrap is the way to cut down on bag clean up. For the record, cleaning tips and bags is the worst part of cookie decorating. I. HATE. IT. So here is how to make it easier - first you get a piece of cling wrap and put your icing in the center of it. Then you roll it up till you have kind of a "log" of icing wrapped up. Pick up both ends of the plastic wrap and spin the log like you were getting ready to snap a towel (think back to when you were a kid at the swimming pool). Place the log of icing into a bag.
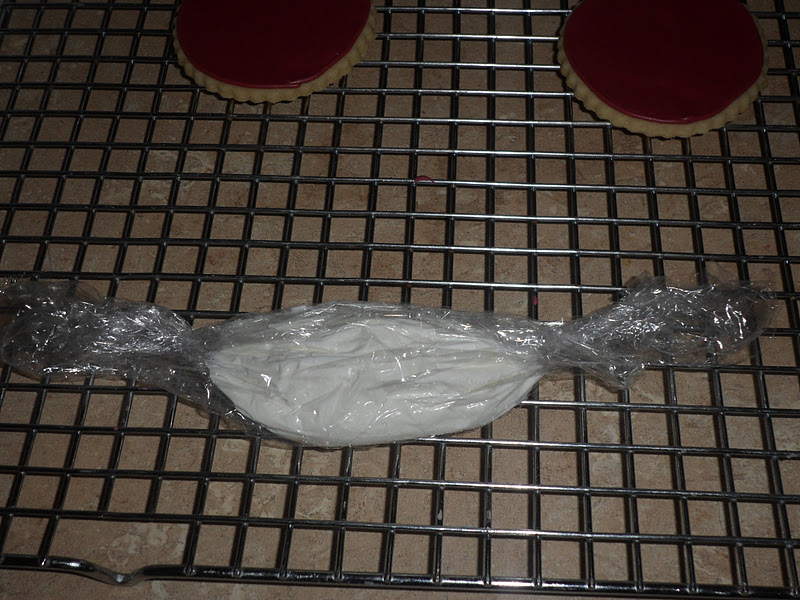
At this point I use a long handled paint brush (which I use for food) to scooch the end of the cling wrap into the tip end of the bag.


Cut off the end of the cling wrap so it is flush with the coupler and put the tip on.

If you have never done this before, you may think it is a hassle and not worth the effort. Trust me, it is well worth it, because it only takes a minute to do and it will spare you a ton of clean up. AND, I use the disposable bags over and over again. The cling wrap gets pulled out and the bag only needs a very quick rinse. And I can use the disposable bags at least 10 - 12 times before it wears out and I actually need, well, to dispose of it. The tips are still a pain to clean - oh well. I soak them in hot water before I attempt it.
* After you have your icing in your bags you are ready to go with outlining. My only advice with outlining is to move quickly for straight lines. The slower you go, the more the icing wants to squiggle on you.
* Now, a word about flood icing. After mixing it up, let it sit for a few minutes for the bubbles to rise to the surface and then gently stir them out. There will still probably be a couple of bubbles to pop with your handy dandy toothpick, but it will cut WAY down on the number of them.

* I use squeeze bottles to add the flood to the cookies.

Here is an evil bubble about to be popped with a toothpick. Die evil bubble!

* When you are doing really dark icing and really light icing together on one cookie, let the icings dry really well before adding the opposite color to cut down on the chance of the colors bleeding into one another. The black and white cookies below are a prime example of that.

* My favorite food coloring is Americolor which I buy at Hobby Lobby or online. The colors are fantastic and the darker colors don't leave a bad aftertaste. I couldn't have made my tie dye cookies look as vibrant without them.

* If you want your icing to be white, use white food coloring. Yes, there IS such a thing. It makes and keeps the icing a crisp snowy white like on these baby cookies - say no to dingy whites!

* My favorite tips for doing fine detail work are PME tips. I won't do writing without them.

That's about it my friends. Experiment - Enjoy - Practice! And remember, it's just a COOKIE so don't stress over it. Even if it doesn't turn out the way you want it to, it will still taste good AND make someone smile!
Happy holiday baking and

These are all fabulous tips, Lisa! You also happen to have hands of gold, but perhaps that is another blog post! ;-) xo
ReplyDeleteMy heart is FULL of THANKS for this post...this was a GREAT read and perfect for me!! I love your tips and treasures here, Lisa, seriously thank you. I know how much goes into a post like this so kudos buddy.
ReplyDeletePINNED for others to see your great info!
ReplyDeleteThose little cookies that hang off of the teacups are wonderful!
ReplyDeleteYour cookies are always amazing! I can't believe you've mastered all this in a years time self taught.
ReplyDeleteThanks so much!! I have been gathering info and I must have over 100 cutters so I am so glad for your tips. Very timely!!!!
ReplyDelete